Enabling USB Debugging on an Android Device
The steps to enable USB debugging depend on the version of Android running on the target device, as indicated in the following table:
| Android Device | Instructions |
|---|---|
|
Android 4.0 and newer (Jelly Bean) |
Enable the USB Debugging option under Settings > Developer options. For Android 4.2 and newer, Developer options is hidden by default; use the following steps:
For more information, see Unlocking Jelly Bean and Higher Devices |
|
Kindle Fire devices |
Select Settings > Security and set Enable ADB to On. |
If you are running Android 4.2.2 or later, you may see the following dialog when you connect your device to your PC running RAD Studio:
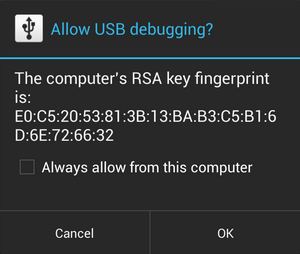
Click OK to allow USB debugging on your PC. If you accidentally click Cancel, disconnect your device from your PC and connect it back to make the dialog show up again on your device.
Troubleshooting
If your Android device is not correctly detected by RAD Studio or the system Device Manager, follow the steps above to verify that USB debugging is enabled.
For general information about development setup for Android devices, see the Android documentation.