Installing the Android Development Tools
- Important: You do not need to install the Android tools yourself.
- The installer for RAD Studio installs the current recommended and tested versions of the Android development tools during the RAD Studio product installation.
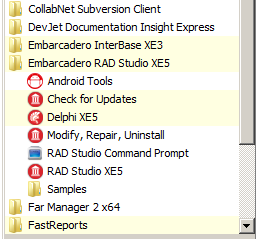
- The Android development tools are conveniently accessible using Start > All Programs > Embarcadero RAD Studio > Android Tools, as shown here:
-
- The Android Tools menu item opens the Android SDK Manager, from which you can start the Android Virtual Device Manager.
- The installer gives you the option to not install the Android SDK and NDK. If you opt out in the installer, you can either:
- Use a previously installed Android SDK and NDK.
- Install the Android development tools yourself, following the steps in this topic.
- Be aware that you need to use the recommended versions of the Android development tools; alternate versions might introduce changes that cannot be supported by RAD Studio.
- Note: The JDK is installed if you do not have the recommended version of Java (1.6 or 1.7), regardless of whether the Android development tools are installed for you during product installation.
Having the Android development tools installed on your development system is required for developing Android apps using RAD Studio. To build mobile apps for the Android target platform, you also need to add an Android SDK to the RAD Studio SDK Manager.
Here are the default installed locations of the Android development tools as installed by the RAD Studio installer:
- Java Development Kit (JDK):
C:\Program Files\Java\jdk1.7.0_25 - Android Software Development Kit (SDK):
C:\Users\Public\Documents\RAD Studio\12.0\PlatformSDKs\adt-bundle-windows-x86-20130522\sdk - Android Native Development Kit (NDK):
C:\Users\Public\Documents\RAD Studio\12.0\PlatformSDKs\android-ndk-r8e
Installing the JDK/SDK/NDK
- Install the JDK (Java development kit):
- On the PC, download and run the JDK installer, which is available here:
- Install the Android SDK (software development kit):
- In your browser on the PC, open the Android SDK download page and click Download the SDK Tools ADT Bundle for Windows.
- On the Get the Android SDK page, you can select either 32-bit or 64-bit, according to your Windows platform.
- This download includes the SDK tools and the Eclipse IDE.
- After the download completes, you can safely delete the SDK\adt-bundle-windows-x86_64-20130522\eclipse folder, unless you want to use the Eclipse IDE.
- From your <SDK> directory, run SDK Manager.exe.
- Tips: If the Android SDK Manager does not start, try these suggestions:
- Right-click SDK Manager.exe and choose Run As Administrator.
- Run android.bat from the \tools directory inside your <SDK> directory.
- Tips: If the Android SDK Manager does not start, try these suggestions:
- In the Android SDK Manager tree, check (enable) the following nodes:
- Tools node
- SDK Platform node within the Android <version> (API <level>) node, where <level> must be 9 or a higher value (for example, "18").
- Note: RAD Studio supports Android 2.3 and later versions regardless of which SDK Platform you download. Android SDK platforms are backward compatible.
- Click Install <n> packages, click Accept License to accept the required licenses, and click Install to install the required software.
- You can close the Android SDK Manager when the installation finishes.
- In your browser on the PC, open the Android SDK download page and click Download the SDK Tools ADT Bundle for Windows.
- Install the Android NDK (native development kit):
- On the PC, download and unzip the NDK for your Windows version (32-bit or 64-bit), available here:
After installing these tools, you need to add an Android SDK to RAD Studio, as described in the next section, and then you can start building mobile applications for the Android platform.
Handling an Android SDK Manager Issue on Windows 8
On Windows 8, you might see errors when you start the Android SDK Manager. If this happens, you might not be able to download any additional SDKs.
The solution is to edit the android.bat file and change the line that launches the Android SDK Manager. Add -Djava.net.preferIPv4Stack=true to the call to Java, as follows:
call %java_exe% -Djava.net.preferIPv4Stack=true %REMOTE_DEBUG% -Dcom.android.sdkmanager.toolsdir="%tools_dir%" -Dcom.android.sdkmanager.workdir=%work_dir% -classpath "%jar_path%;%swt_path%\swt.jar" com.android.sdkmanager.Main %*
This issue seems to be related to Windows 8 wanting to use Internet Protocol V6.
Configuring RAD Studio to Work with Your Installed SDK
You can use specific versions of the Android SDK simply by pointing the RAD Studio SDK Manager to your installed <SDK> location.
- Open the Create a New Android SDK wizard by using either Tools Options or Project Manager:
- Choose Tools > Options > Environment Options > SDK Manager | Add | Add new.
- In the Project Manager:
- Right-click the Android target platform and select Properties from the context menu.
- In the SDK field on the Platform Properties dialog box, click Add new in the dropdown list.
- On the Add a New SDK dialog, click Add new in the dropdown list.
- In the Android SDK Base Path and the Android NDK Base Path fields, browse to and select your installed <SDK> and <NDK> locations, respectively.
- The Create a new Android SDK wizard now populates the rest of the fields here and on the Android tools locations page. Allow a moment for this process to complete.
- For any fields that are not auto-populated or are marked with
 , click the entry field and browse to the installed location of that library on your system.
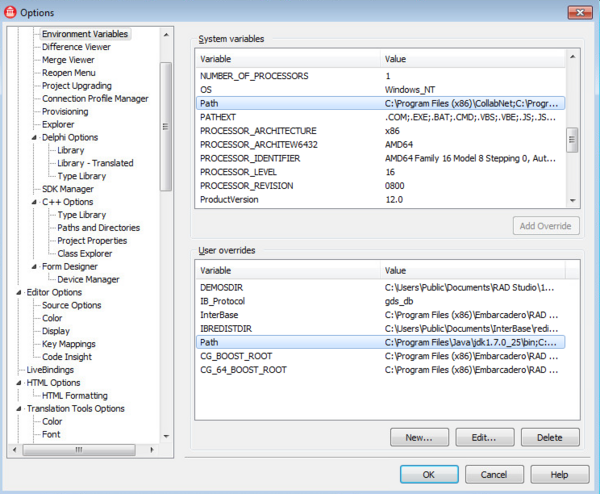
Adding Java as a User Override to Your System Path
If you installed the JDK yourself, Java might not be in your system path. For example, if Java is not in your system path, you must use android.bat to start the Android SDK Manager (instead of SDK Manager.exe). If you want to optimize for Android development, you should add Java to your system path environment variable.
- Choose Tools > Options > Environment Options > Environment Variables.
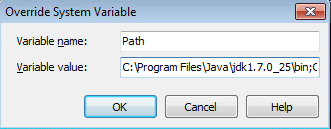
- In the System variables pane, double-click the Path item.
- In the Override System Variable dialog box, click the Home button on your keyboard to bring the focus to the beginning of the path.
- Add the path to Java at the beginning of your system path (it must precede all references to System32).
- For example, the default installed path to java.exe in RAD Studio is:
-
C:\Program Files\Java\jdk1.7.0_25\bin - Note that you should only need to add an override if your Java installation is different from this.
-
- End your path entry with a semicolon (;):
-
- For example, the default installed path to java.exe in RAD Studio is:
- Click OK on the Override dialog box, and click Yes on the Confirm dialog box that follows.
- Verify that you see the path to Java shown at the start of the Path field in the User overrides pane:
-
- Click OK to close the Tools Options Dialog Box.