Creating an iOS App
To create your iOS app:
File > New > FireMonkey Mobile Application - Delphi
At the XE5 release, only Delphi supports FireMonkey iOS apps.
iOS Forms
Using the FireMonkey Mobile Form, you can add additional Delphi forms the same way you do with Windows and Mac OS X applications.
The iOS form has specific hardware-dependent properties. For example, the iOS form has a different shape or footprint than a standard desktop FireMonkey form, as follows:
- For a FireMonkey iOS application, the form is a vertical shape:
- ClientHeight = 480 pixels
- ClientWidth = 320 pixels
- For a FireMonkey desktop application, the form is a horizontal shape:
- ClientHeight = 480 pixels
- ClientWidth = 600 pixels
FireMonkey iOS Workflow
At different times during the FireMonkey iOS development process, you need to work either on your development platform or on the Mac. After you complete the required setup steps and compile your project in the RAD Studio IDE, running your project will transfer the executable and necessary libraries to the Mac.
Important: Start Here
- Before starting your first iOS project, you must perform several important installation and setup steps on both Windows and the Mac. For example, you need to provide a Development Provisioning Profile for any specific iOS development devices you want to use in testing your application on the Mac.
- The setup steps are described in iOS Mobile Application Development.
Then develop your project in the following general sequence:
Steps in RAD Studio
- Start your project using either of the FireMonkey iOS wizards:
- File > New > Other > Delphi Projects > FireMonkey Mobile Application
- Select one of the templates and applications that are presented, such as Tabbed, or Blank Application.
- The iOS Form is displayed in the Form Designer.
- Use the Form Designer and Code Editor in RAD Studio to add controls to the form, to set values for properties and events, and to write the code behind.
- Tip: Start creating your iOS app by working through the Mobile Tutorials: Delphi Mobile Application Development (iOS and Android).
Steps on the Mac and on the iOS Simulator or an Attached iOS Device
- For prototyping purposes, run or debug your project using the iOS Simulator target platform.
- Tip: Run your application on the iOS Simulator at least once after creating the project (and whenever you make changes or add new files to the project).
- Select the device that is to run your app, such as:
- The built-in iOS Simulator for initial debugging purposes.
- A physical iOS device, connected to the Mac.
To run your iOS app on an iOS device:
- Your iOS device must be connected to the Mac by USB cable.
- You need to add a new SDK from the SDK Manager page. After you add the new SDK, your selected version of the iOS SDK is pulled from the Mac to your development system.
- You must create a Development Provisioning Profile for testing your application on your development iOS device.
- The Provisioning Profile associates your Apple Developer ID with:
- Specific iOS apps you want to run (identified by App ID)
- The specific iOS devices where you want to run the apps (identified by the device ID or UDID)
- You can find the 40-character UDID through Xcode or iTunes. For more information, see https://developer.apple.com/ios/manage/devices/howto.action
- The Provisioning Profile associates your Apple Developer ID with:
For more information about the workflow for iOS apps on the Mac, see https://developer.apple.com/library/ios/#documentation/Xcode/Conceptual/ios_development_workflow/00-About_the_iOS_Application_Development_Workflow/introduction.html.
Preferred Components for iOS Apps vs. Desktop Applications
On the iOS platform, the native style and format is distinct from the style and format of desktop applications. That is, your iOS app should observe iOS-specific rules about formatting and placement of components.
For example, here is a list that compares FireMonkey components typically used in desktop apps with components that are preferred for iOS apps:
Key Component Differences:
| Desktop Components | iOS Components |
|---|---|
|
TTreeView |
TListView |
|
TRadioGroup |
TSegmentedControl |
|
TCheckBox |
TSwitch |
|
TMenuBar |
TToolBar with buttons |
Preferred FireMonkey Components for iOS Apps:
| TButton | TEdit | TCalendarEdit | TListView |
| TTrackBar | TTabControl | TSpeeButton | TMemo |
| TSwitch | TComboBox | TToolBar | TScrollBox |
| TLabel | TNumberBox | TListBox | TProgressBar |
| TPanel |
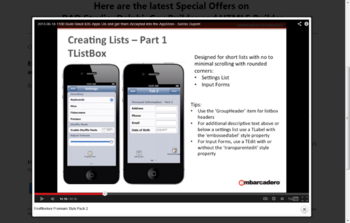
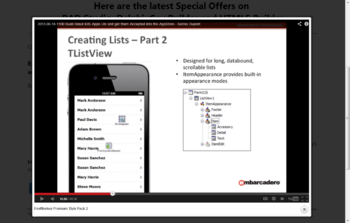
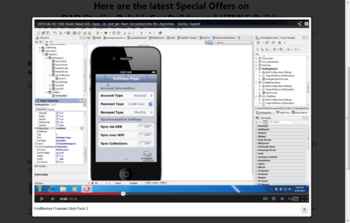
For further information, in both PDF and video format (including specific recommendations for format and style), see the EDN article iOS User Interface Design with Delphi XE4.
For example, the EDN article contains tips for using common components such as TListBox, TListView, TToolBar, and TSpeedButton in your iOS apps, plus a detailed demo that shows you how to create a Settings app on the iOS platform:
| Sample Individual Frames from iOS User Interface Design with Delphi XE4 | ||
|---|---|---|
|
|
|
|
Component Restrictions for FireMonkey iOS Apps
While you are designing your iOS app in RAD Studio, you can only use components that are supported on iOS devices. However, be aware that the Tool Palette might contain some components that are Windows-only or are otherwise not supported on iOS.
International (Unicode) Characters Not Accepted on iOS Target Platform
International (Unicode) characters are not accepted in several places in an iOS app. For example, names such as hélène and éléments can prevent the iOS app from running.
Specifically, do not use international characters in:
- Your Windows user name
- A connection profile name
- Your iOS project name
- The name of the application bundle (the
.appexecutable)
The following message appears when you try to build an iOS app that contains Unicode characters:
Can't get full path to application bundle. No such file or directory
In this case, the iOS app is generated in the PAServer scratch-dir, but it does not run on either the iOS Device or the iOS Simulator.
Using Frameworks in iOS Apps
Delphi RTL
Some RTL units that provide basic functionality are common for Windows, Mac, and iOS, such as System.pas or System.SysUtils.pas.
A number of RTL units are iOS-only (see iOS Objective-C Frameworks). These units are prefixed with the iOSapi unit scope.
FireMonkey
The FireMonkey framework is ideal for the iOS target platform, and it also supports Mac OS X and both Win32 and Win64. See FireMonkey Platform Prerequisites.
VCL (not available for iOS or Mac)
The VCL is available only on Windows (32-bit or 64-bit).
iOS Objective-C Frameworks (iOSapi)
The RTL contains a number of units that provide Delphi interfaces to iOS frameworks written in Objective-C. These units are scoped with iOSapi and are typically located in the /source/rtl directory of your product installation:
- iOSapi.AssetsLibrary
- iOSapi.AVFoundation
- iOSapi.CocoaTypes
- iOSapi.CoreAudio
- iOSapi.CoreData
- iOSapi.CoreGraphics
- iOSapi.CoreImage
- iOSapi.CoreLocation
- iOSapi.CoreMedia
- iOSapi.CoreMotion
- iOSapi.CoreTelephony
- iOSapi.CoreText
- iOSapi.CoreVideo
- iOSapi.Foundation
- iOSapi.GLKit
- iOSapi.MediaPlayer
- iOSapi.OpenGLES
- iOSapi.QuartzCore
- iOSapi.UIKit
The FireMonkey framework relies on some of these units.
Documentation for iOS Libraries
For help on these API, see the Apple documentation at iOS Developer Library. RAD Studio does not provide help for the libraries you might need to use on the Mac.
You can also register as an iOS developer (free of charge) at the iOS Dev Center. Being a registered member of the iOS Developer Program enables you to distribute apps in the App Store (this is along with other requirements, such as a developer certificate and a provisioning profile). For more information, see https://developer.apple.com/programs/ios/gettingstarted/
OpenSSL Support
RAD Studio uses OpenSSL for HTTP support in Indy, Amazon and Azure cloud services, or DataSnap clients (when encryption filters are enabled). If your iOS application requires OpenSSL support, you must configure your project to include the required libraries: libcrypto and libssl.
- For the iOS Device target platform, which does not support dynamic libraries, you need a static version of these library files (libcrypto.a and libssl.a). To obtain these library files, do either of the following:
- Download the pre-compiled libraries from Github.
- Build these libraries from sources. Download the sources from Github and follow the steps described in Tutorial: Script for Building OpenSSL for iOS (iPhone/iPad) to compile these libraries.
- Once you have these library files, copy them into a folder where your project searches for libraries, such as the main project folder.
- For the iOS Simulator target platform, which does support dynamic libraries, do either of the following:
- Use
IdOpenSSLSetLibPathand set the path to the location on the Mac where the library files (libcrypto.dylib and libssl.dylib) are located.- Note: Letting the Mac find the OpenSSL libraries on its own might not work for the iOS Simulator target platform, as you might have an unsupported version of the OpenSSL library files in the library folders that the simulator uses.
- Copy the iOS simulator OpenSSL library files from the Mac into your project source folder, and deploy them to the simulator along with your application.
- Use
Loading and Deploying Files
When you deploy your application for the iOS Device target platform, if you plan to provide files along with your application to load those files at run time, use the Deployment Manager to place those files in the StartUp\Documents folder during deployment.

Use the following code to locate those files at run time:
TPath.Combine(TPath.GetDocumentsPath, 'filename')
Here filename is the name of your file, such as 'dbdemos.gdb' in the screenshot above. The TPath record is declared in System.IOUtils unit, so you need to add System.IOUtils in the uses clause.
See Also
- FireMonkey Mobile Application Templates
- iOS Mobile Application Development
- Mobile Tutorials: Delphi Mobile Application Development (iOS and Android)
- Creating a FireMonkey Component (Delphi)
- FireMonkey Application Design
- Creating a FireMonkey Application
- Creating an Android App
- iOS Dev Center
- EDN: iOS User Interface Design with Delphi XE4