Deploying Your iOS Application for Submission to the App Store
After you have successfully configured your development environment for iOS application development, created a distribution provisioning profile for your application, completed the Provisioning page for the Application Store platform configuration, and built and debugged your iOS app, you can deploy your app for submission to the Apple App Store.
To submit your mobile application to the App Store:
- Configure your application entry in iTunes Connect to wait for upload.
- Prepare your application for deployment on RAD Studio.
- Generate an application archive file (
.ipa) for your application. - Upload your application to the App Store.
Configure Your Application Entry in iTunes Connect to Wait for Upload
- Note: If you are part of a development team, you must ask your team leader to give you access to iTunes Connect. See the Apple documentation for more information.
To submit a new application to the App Store, you first need to create an entry for your application in iTunes Connect. To submit a new version of an application that you previously uploaded to the App Store, you must configure your application entry in iTunes Connect for a new version.
When you finish configuring your application entry, your application has the "waiting for upload" status.
Create an Entry for Your Application in iTunes Connect
- Go to itunesconnect.apple.com, and log in with your Apple ID. You get an Apple ID when you join an iOS developer program.
- After you log in, select Manage Your Application.
- On the application management page, select the Add New App button.
- On the application creation page, select iOS.
- Follow the instructions in the wizard, and complete the pages with the required data.
For more information, see the Apple documentation.
Configure Your Application Entry in iTunes Connect for a New Version
- Go to itunesconnect.apple.com, and log in with your Apple ID. You get an Apple ID when you join an iOS developer program.
- After you log in, select Manage Your Application.
- On the application management page, select your application. Only applications viewed recently are listed, so you might need to use the search.
- On the application page, click the Add Version button.
- Fill the New Version page with the required data, and click Save Changes.
- Back to the page of your application, click View Details under New Version, and click Ready to Upload Binary.
For more information, see the Apple documentation.
Prepare Your Application for Deployment
Before you generate an application archive file for your application, you must check the settings of your application, such as the application version or the app ID, and update them if necessary. See Deploying Your Final iOS Application.
Generate an Application Archive File for Your Application
To generate an application archive file for your application, do the following:
- Run the Platform Assistant on the Mac.
- On RAD Studio, on the Project Manager:
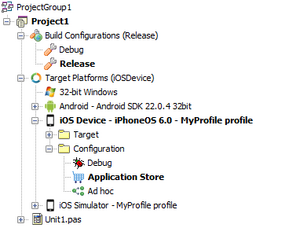
- Expand the Build Configurations node and double-click the Release configuration, or any other platform-agnostic configuration that you want to use to build your signed application package.
- Expand the Target Platforms node and double-click the iOS Device target platform to select that platform. The selected target platform is displayed using a bold font.
- Expand the iOS Device node, expand the Configuration node within, and double-click the Application Store platform configuration node to select that platform configuration. The selected platform configuration is displayed using a bold font.
- Select Project > Deployment, and click the Deploy
 button to deploy your application.
RAD Studio builds your application using the SDK you previously added to the IDE, connects to your Mac using the connection profile you configured for the iOS Device platform, and the Platform Assistant running on the Mac prepares your application for submission to the App Store.
Your application, generated on the Mac, is then copied over to your development system. You can find your final application file (.ipa) in your project's folder: <Your Project's Folder>\iOSDevice\<Selected Configuration Name>\<Project Name>.ipa. For example: C:\Users\Username\Documents\RAD Studio\Projects\ProjectFolder\iOSDevice\Debug\ProjectName.ipa.
Upload Your Application to the App Store
After you create an entry for your application in iTunes Connect, you can upload your application archive file:
- On the Mac, run the Application Loader application.
- On the Application Loader, select Deliver App.
- In the combo box, select the application entry you previously created in iTunes Connect.
- Click the Choose button, and browse to your application archive file (
.ipa).- Tip: You do not need to bring your application archive file from your development PC into your Mac. You can find the original copy of the application archive file in the Mac, inside the scratch directory.
- Click Send.
At this point, your application goes through the following testing process:
- The Application Loader starts a first round of automated tests on your application. If your application passes this first round of tests, the Application Loader proceeds to send your application archive file to Apple.
- When Apple gets the file, they perform on their end another round of automated tests on your application. If your application passes this second round of tests, Apple puts your application in a queue for manual testing.
- Eventually, Apple reviews your application manually.
When your application passes or fails any of those tests, you get an email notification.
If your application fails any test, the submission of your application to the App Store is aborted. You must fix the reported error and repeat the steps in this page, from generating the application archive file on. For example, if Apple tells you that your bundle ID entries do not match, check that you configured in Project > Options > Version Info a value for the CFBundleIdentifier key that fits the app ID you created for your application.
If your application passes all the tests, your application is published in the App Store, or scheduled to be released in the future if you specified so when you configured the entry for your application in iTunes Connect.